Introduction
As many of you will have seen, I’ve been using Panasonic’s new Full Frame Mirrorless camera, the Lumix S1, since the start of the year.
This is a great camera for photographers with its 24MP FF sensor offering really good low light performance – its very clean even at 10000 ISO!
But it also translates over to decent looking video with its 4K 24p, 25p, 30p, 50p, 60p performance. Then there’s also the brilliant 4K/6KPhoto mode that can shoot 60fps in 4K/ 30fps in near 6K (for example 4:3 aspect mode is 4992×3744 pixels).
Switching around manually all these settings can be tiresome, so, I wanted to invite users to take a look at the custom mode features where you can set and store all your favourite settings and recall them in an instance. It saves so much time being able to load settings all in one go!
I have pre programmed all the defaults and custom modes to appeal to a variety of different uses in both PAL land and NTSC. As well as the default Creative Video Mode and M (Manual for 6KPhoto mode with the left dial set on switch [1]) I have programmed C1, C2, and a load of C3 settings for you guys to use & enjoy, edit and fine tune to your own favourites.
Most of the settings are set at elementary levels and that means you can tweak to your own performance preference; that includes;- Flat profile for most, Shutter seconds to be double the frame rate (e.g. 60 SS for 30p) using the 180 degree shutter rule as there is no angles settings in the S series (maybe in a future fw upgrade Panasonic?), pre set WB settings to most used Fluorescent, Tungsten, daylight, Cloudy, fast aperture and lowest ISO. Audio is set to Line level (Lavaliere preference here where you can change sensitivity in the lovelier transmitter). Audio settings in camera are -9dB, Limiter off, Wind = standard. You can easily change them and to Mic or phantom powered Mic levels and re-save the custom mode.
So lets go through the settings I have chosen in version 1 of Nick Driftwood’s S1VIDEO Custom Settings. Lets take you through how to load them up.
How to Install
1/ Download my FREE ‘Nick Driftwood’s Lumix S1 Video Settings‘ here in my members area
NOTE: To Register & Get this FREE, please click the Members/ Log-in/Register from Menu icon top right of this page or the JOIN NOW FREE Membership option at bottom of Reg page, to register first or you wont get in. Once in, Add the Custom Settings to CART, VIEW CART & PROCEED to CHECKOUT. Zero money is taken and you don’t have to enter any payment – just your membership details.
Once downloaded to your computer copy over the unzipped folder AD_LUMIX with its enclosed folder CAMSET and S1VIDEO file to an SD card formatted with the camera (unzip to SD card just as easy), then take out and insert the card into your S1 camera.
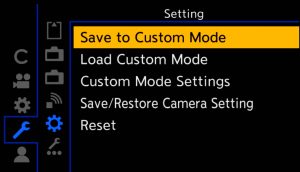
2/ Switch on your camera and cursor down/touch the Spanner menu and then the 5th submenu down, ‘Setting‘ (Custom Modes are handled here).
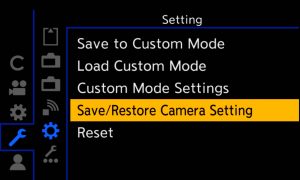
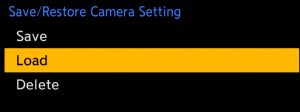
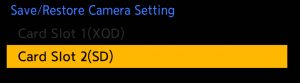
3/ From this ‘Setting’ submenu select ‘Save/Restore Camera Setting‘, select LOAD and your card slot no. (SD or XQD) – ie card where the settings have been copied to. Select ‘S1VIDEO‘ and press the Set button to load it. A screen saying ‘LOAD THE CAMERA SETTINGS with’ S1VIDEO’ underneath will be displayed as it loads my settings into your camera. Note any of my settings do NOT ruin your camera in any way. You can easily reset the custom settings to original.

4/ Done! Now switch around the left dial on the camera and take a look at the various settings loaded on Creative Video Mode, M, C1, C2 and C3 settings for video.
S1VIDEO Settings
Here’s a description of what you’ll see;-
When you move the dial to the Creative Video Mode icon position (see pic below) you’ll see 24p 4K UHD set to CNED (Cinelike D) picture profile, 1/50 SS (180 degree shutter rule), f4 aperture, 100 ISO, WB set to Daylight 5500K to start.
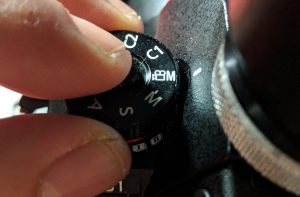
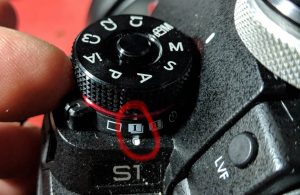
When you move the left dial back one to ‘M‘ and turn the lower switch to the ‘1’ icon (like below), you’ll notice 6KPhoto mode inFlat picture profile, 4:3 aspect ratio, 1/60 SS (180d), f4, 100 ISO, and WB 5500K.
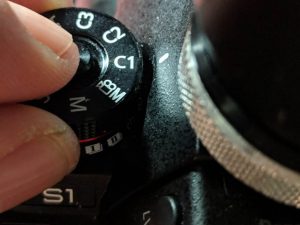
Turn the lower dial switch back to the first position and turn the top dial back up two places to position ‘C1′ (Custom Mode setting 1 see pic below) and you’ll see its now set to C1 24p Flat 4K, 1/50 ss, f4, ISO100 and WB 5500K.
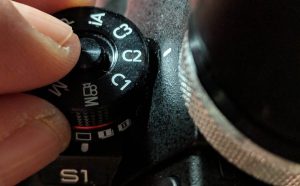
Turn the top dial again to ‘C2’ custom setting and it show C2 24p HLG 4K a rec2100 HDR profile for High Dynamic Range recording in Hybrid Log Gamma. This is set to C2 24p, HLG, 4K, 1/50 ss, f4, ISO400 (default lowest ISO for HLG) and WB 5500K.
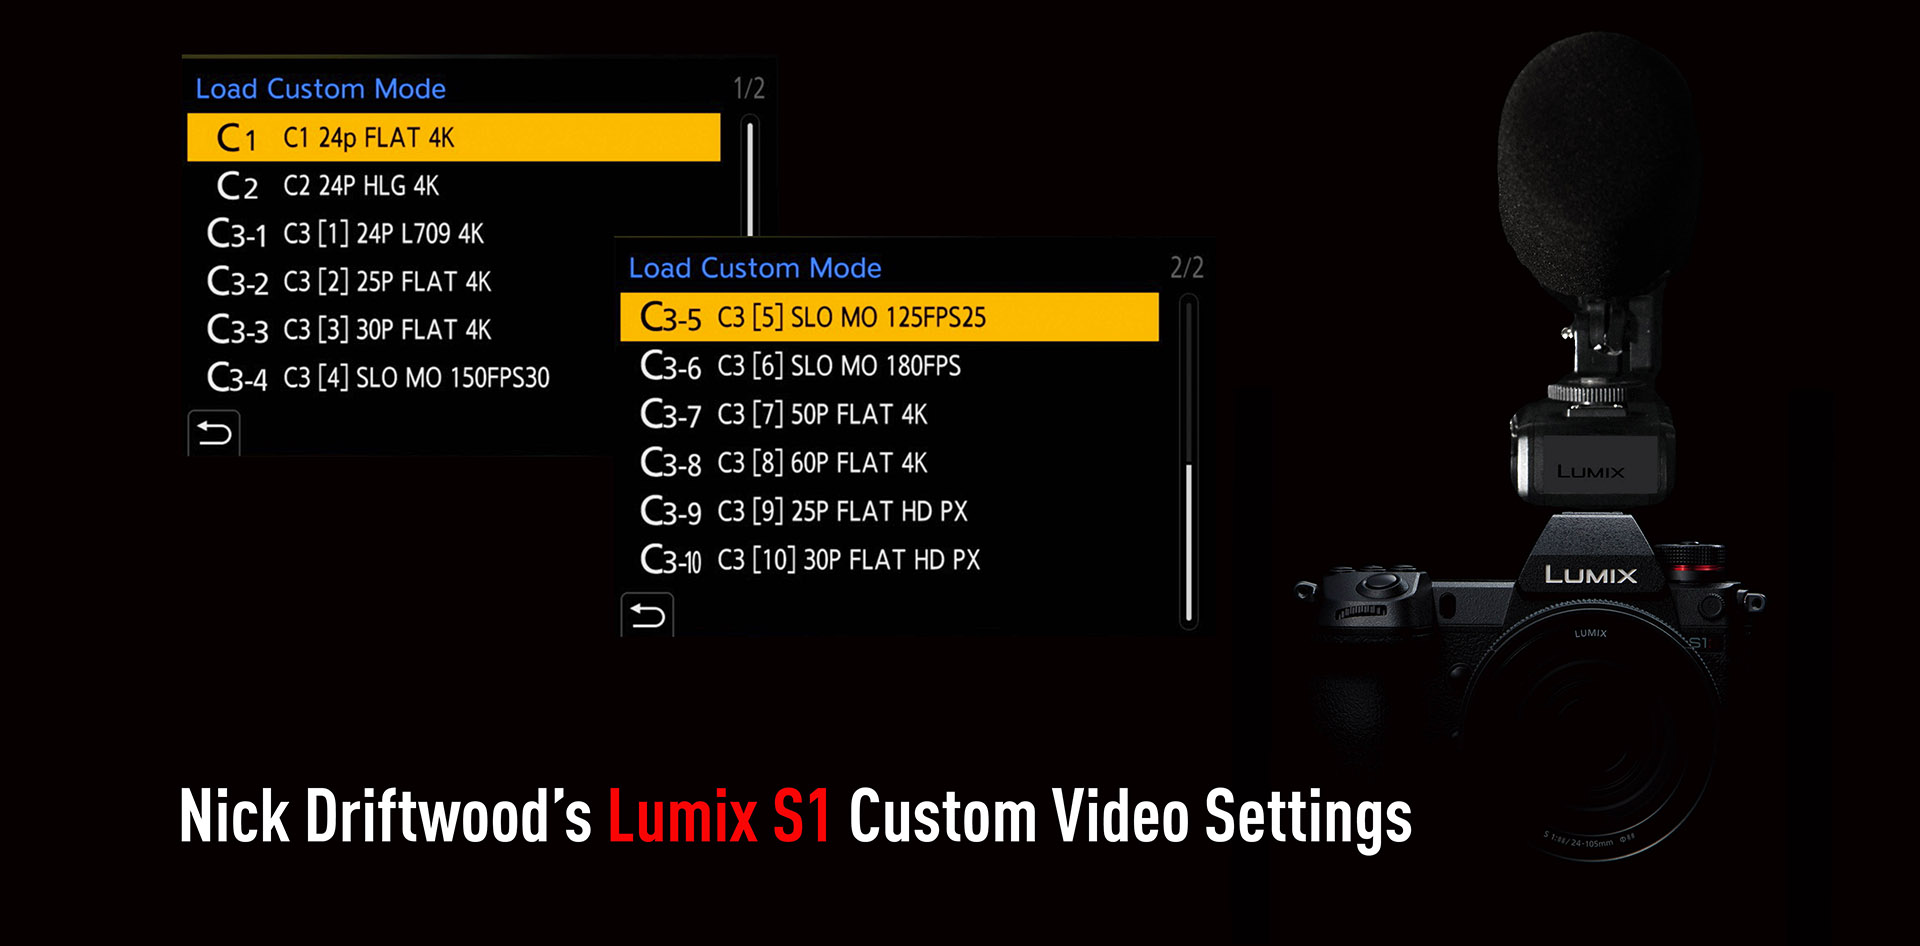
10 Choices for C3
Now turn the top dial to ‘C3’ for the interesting stuff. In this menu it defaults to C3 [1] the first setting and you can load upto 10 different settings into this slot which you load by pressing MENU and notice the top menu settings shows a C and two cogs denoting each page of my custom settings which at anytime you can select and load into C3. I have preprogrammed 10 fav settings (the first 8 on cog page 1, the last two on the second cog page.
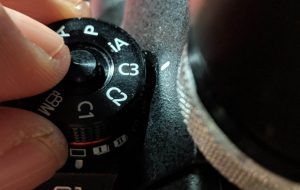
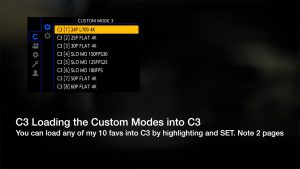
If you select a C3 setting from below and press SET to load, here’s what they do;-
- C3 [1] 24p 709L 4K – Rec709 like picture profile in 23.98fps for fast turnaround of SDR broadcast style with 1/50 SS (180d rule), f4, ISO 100, WB 5500k.
- C3 [2] 25p Flat 4K – PAL standard 25fps 4K using the Flat picture profile with decent DR capture at 1/50 SS, f4, ISO 100, WB 5500K defaults.
- C3 [3] 30p Flat 4K – NTSC standard 29.97fps 4K using the Flat picture profile in 1/60 SS, f4, ISO 100, WB 5500K.
- C3 [4] SLO MO 150FPS30 – Full HD NTSC comparability in Hi Speed mode 150 fps in a 30p wrapper using the Flat picture profile with auto exposure, WB 5500K daylight default.
- C3 [5] SLO MO 125FPS25 – Full HD PAL comparability in Hi Speed mode 125 fps in a 25p wrapper using the Flat picture profile and auto exposure, WB 5500K daylight default.
- C3 [6] SLO MO 180FPS30 – Full HD NTSC comparability in Hi Speed mode 180 fps ‘cropped’ in a 30p wrapper using Flat picture profile with auto exposure, WB 5500K daylight default.
- C3 [7] 50p Flat 4K – PAL standard 50fps 4K APS-C crop using Flat picture profile at 1/100 SS (180d rule = 2×50 is 100 for double the frame rate), f4, ISO 200, WB 5500K defaults.
- C3 [8] 60p Flat 4K – NTSC standard 60fps 4K APS-C crop using Flat picture profile at 1/123 SS (180d rule = 2×60 is 125 nearest for double frame rate), f4, ISO 200, WB 5500K defaults.
- C3 [9] 25p Flat HD PX – PAL standard 25fps FHD using pixel for pixel readout, Flat picture profile 1/50 SS, f4, ISO 100, WB 5500K defaults.
- C3 [10] 30p Flat HD PX – NTSC standard 29.97fps FHD using pixel for pixel mode, Flat picture profile in 1/60 SS, f4, ISO 100, WB 5500K.
Finally…
Any of these settings can be edited and tuned to your own preference, just remember to change the name to describe your setting and overwrite the custom setting slow and don’t forget to save to settings sd card so you can restore them at a later date if required. Call the overall settings your own name when editing filename.
Here’s an example,
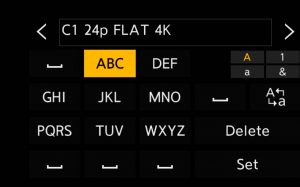
I’ve loaded C3 [1] 24p 709L 4K and want to change the frame rate from 24p to 25p or 30p. How? Simply, go to the frame rate menu (film camera icon menu and third down submenu, look for frame rate – change it to 25p (PAL) or 30p (NTSC). Now go to Spanner/Setting menu and Save to Custom mode to ‘c3’ slot 1. When you’re asked to confirm save press the DISP (Display) button to rename the setting to your desired name of choice. e.g C3 [1] 25p 709L 4K. Easy.
You can edit your custom names using Edit Titles

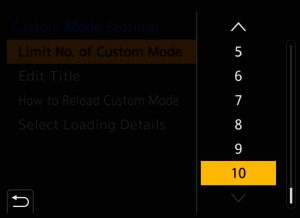
If you wish to increase or decrease the amount of custom modes visible on the Custom menu screen simply limit the amount using this screen (see pic below)
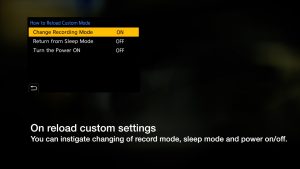
If you want to load my settings without changing your exposure settings, recording mode, sleep mode or power on check the settings in this menu (see pics below) to = OFF.

Well I hope this helps you get along on your way and its great to have so many memories to store settings. Things just couldn’t get any easier.
PS All the photo modes are pretty much left untouched at roughly default and WB settings. Have fun experimenting and saving your own. I have also included a HDMI Monitor = ON version (HDMION) of the same settings to display camera settings in external devices for those who need it.
Nick Driftwood